Monitoring Switches
Overview
If your switches are recognised by Highlight, you can enable LAN switch monitoring to get a fast, detailed picture of how they are performing - traffic levels, health issues, and outages on every port, presented in a simple clear format. You can designate specific ports as 'critical' (for example, server connections) and Highlight will alert if these ports have problems.
Collecting Data
Highlight collects two types of data from the switch:
At every poll on every port (typically every 5 minutes)
Stability - State changes
Highlight detects any state change, essentially checking if a port is down
Load - Traffic levels
In and out, calculated as a percentage of port speed with 80% as the threshold value
Health - Error frequency
Reported as errors per 1000 packets. What constitutes an error varies by vendor but usually is a mix of low-level errors (framing, duplex, bad-sized packets etc.) and Layer 2 errors (CRC checks). For more information consult the individual vendor documentation. Errors are normally caused by faulty cabling or a faulty switch port.
Once an hour on every port
Update interval
This information is not real-time and so will only update in the GUI at the same interval as data is collected, i.e. per hour.Highlight collects the following every hour to update basic data on the switch:
- Port Name: as configured on the switch as the description
- Port State: up or down and the length of time it has been up or down
- Port Speed: normally 10M / 100M / 1G bps
This information is used on the Technical Details page and pop-up, see section below.
Port Summary
The upper part of the Details page shows a summary of every port on the switch. For all time periods (day, week or month) the summary shows:
- any issues as stability, load or health
- the severity or frequency of any issues
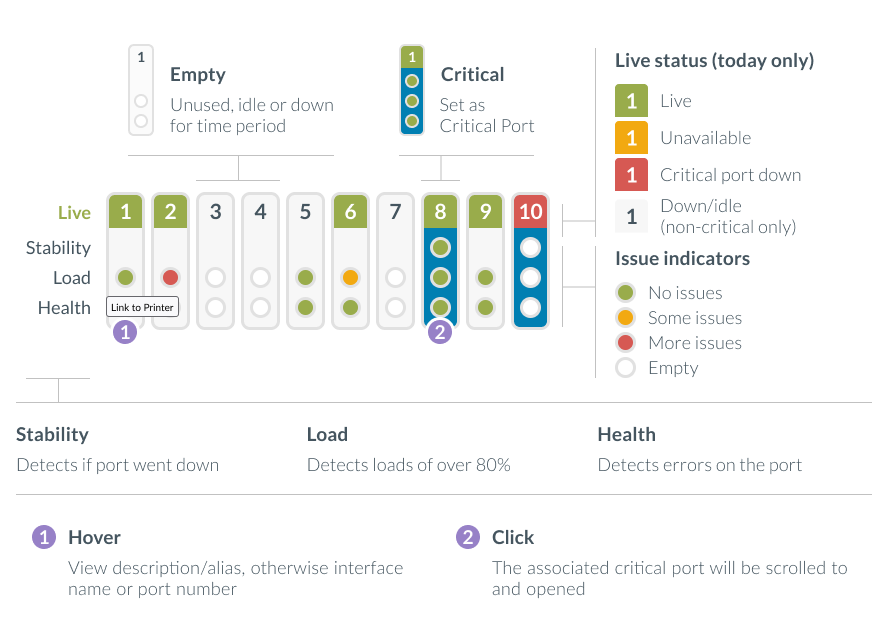
Today: Live Status
When Today is selected a live status is shown as a coloured square behind the port number. This status is obtained by the poller every 5 minutes. The colours mean:
- the port is live
- the live status is unavailable due to issues obtaining details; all ports will show as amber
- critical port is down, red is only used for critical ports
- non-critical port is down, idle or unused, grey is only used for non-critical ports
- indicates a port that was idle, unused or down throughout the selected time period - a useful way to spot ‘free’ ports on a switch
- indicates an active port; the marker will remain green for each metric (stability, load, health) unless certain conditions occur, further details below
- indicates port was down for at least one sample in the time period
- indicates port was down for 10% or more of samples in the period
- indicates port load was > threshold on 5% - 50% of the samples in the time period
- indicates port load was > threshold on 50% or more of the samples in the time period
- indicates port error rate was >0 for 0.5% - 5% of the samples in the time period
- indicates port error rate was >0 for 5% or more of the samples in the time period
Stability:
Note: Stability is only shown on critical ports. Non-critical ports may be inactive for long periods so stability is not a relevant metric.
For each poll within the selected time period, Highlight detects any state change, essentially checking if a port is down.
Load:
For each poll within the selected time period, Highlight detects load greater than the threshold value and then counts how many instances of excessive load occur. The threshold is 80%.
Health:
For each poll within the selected time period, Highlight detects any errors.
Alias or interface name
Hovering over an individual port will show a tooltip with that port’s alias or interface name, if one has been configured on the switch; otherwise the tooltip will show the interface name. If neither the alias nor the interface is available, the port number is shown.
Critical ports
Clicking on an individual critical port will scroll to and expand a chart for that port for the selected time period. Each chart is labelled with the slot and port number,and alias or interface name, if available.
Port Summary Filter on All/Active/Critical

- All
- This is the default option. All ports are shown.
- Active
- This includes active and critical ports.
Active means the port had data within the selected time period (day, week or month). - Critical
- Only ports which have been designated as critical are shown.
The filter setting will be remembered when you next log in.
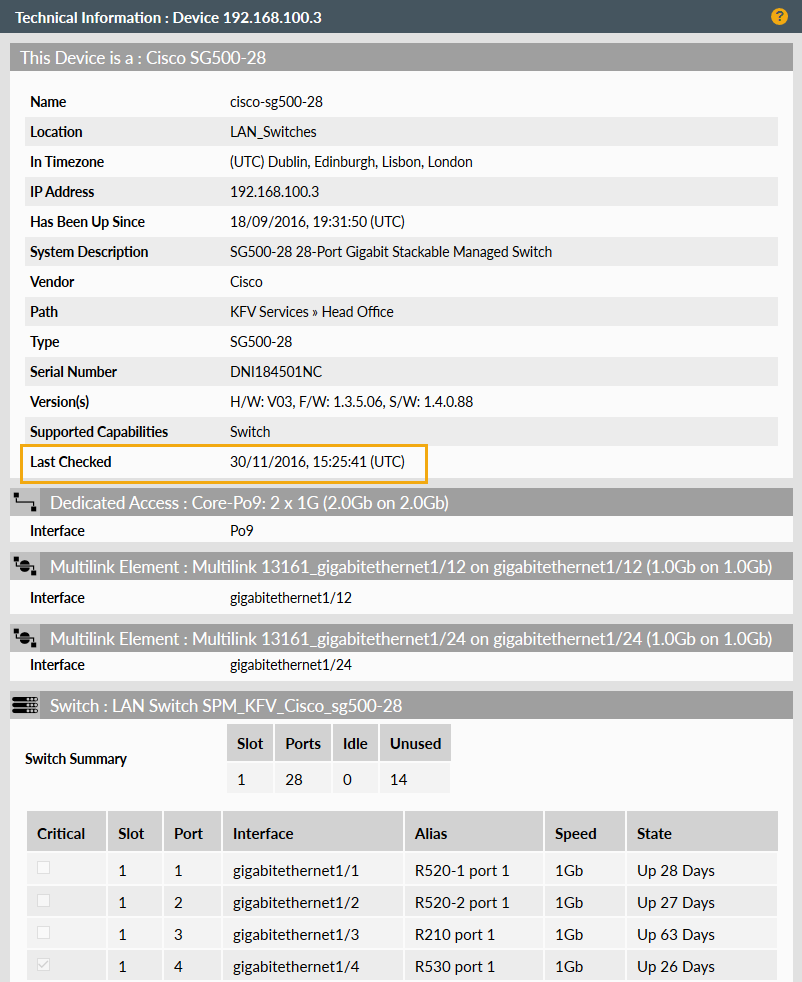
Technical Details
Clicking the Tech info on the Details page shows the information Highlight has on this switch. As outlined in the collecting data from the switch section above, Highlight collects this information on an hourly basis to reduce management traffic overhead. The date / time of the last collection for this switch is shown in the header (Last Checked).
An extract from example output is shown below for a 28 port Cisco Catalyst:
In Admin, Edit Watch, on the Features tab for the switch, use Set Critical Port
Port information
For switches, a summary for each slot is shown with the total number of ports and how many are idle and unused. Then each port on the device is listed with the following information:
- Critical
- whether this port is marked as critical in Highlight, meaning it will affect heat tiles and generate alerts
- Slot
- a number
- Port
- a number
- Interface
- the name used on the device to reference that port
- Alias
- the description configured on the interface, if any
- Speed
- the current speed of this port; some switches return ‘Unknown’ if the port is not in use
- State
- state of the port and the length of time it has been in this state. The description of port states are as follows:
- Up
- port is active
- Down
- changed state from Up in the last 48 hours
- Unused
- most recent state changed within 10 minutes of system power up
- Idle
- a previously used port that has been inactive for over 48 hours
Critical Ports

For the switch, this panel shows a chart for each critical port designated in Highlight. Only critical ports can change the colour of a heat tile and generate an alert email or webhook. Charts are labelled with the slot and port number and that port’s alias or interface name, if one has been configured on the switch. Critical ports are also indicated by a blue background marker in the Port Summary panel.
Disabled port
A port that is disabled behaves the same as if the port is down (red blips etc.)
Stability
Stability blip line is shown as a grey line if unavailable or a thicker green line if up. Hover on the chart to see timestamp and precise values.
| Colour | Grey line | Green line | |
|---|---|---|---|
| Stability | No data | Receiving data | Port down |
A port that is disabled behaves the same as if the port is down (red blips etc.)
Load
Load has two blip lines for in and out. A grey line is shown if unavailable or a thicker green line up to 50%. Hover on the chart to see timestamp and precise values. Above 50% it's shown in coloured blips:
| Colour | Grey line | Green line | ||||
|---|---|---|---|---|---|---|
| Load | No data | 0% to 50% | 51% to 65% | 66% to 80% | 81% to 95% | 96% to 100% |
Health
Health blip line shows coloured blips according to the severity of the line drops and errors detected on the port. Hover on the chart to see timestamp and precise values. Coloured blips indicate approximate values:
| Colour | Grey line | Green line | ||||||
|---|---|---|---|---|---|---|---|---|
| Health | No data | 0 | 1 | 2 - 11 | 12 - 23 | 24 - 52 | 53 - 74 | 75 - 100 |
Related information
With admin privileges see how you enable critical ports
See next section for how critical ports affect heat tiles and generate alerts.
How critical ports affect heat tiles and generate alerts
Only switch ports selected as critical can change heat tiles and generate alerts. If you have admin privileges you can enable a port as critical by using Set Critical Port in Admin, Edit Watch, on the Features tab for the switch or via the Controllers Admin page, Edit watch, Critical Ports tab.
Sensitivity settings
Heat tiles and alerts are controlled by sensitivity settings which are configurable by admin users with the permission Manage folders/locations. Find out more about the sensitivity of heat tiles. For the example here, we assume the following settings:
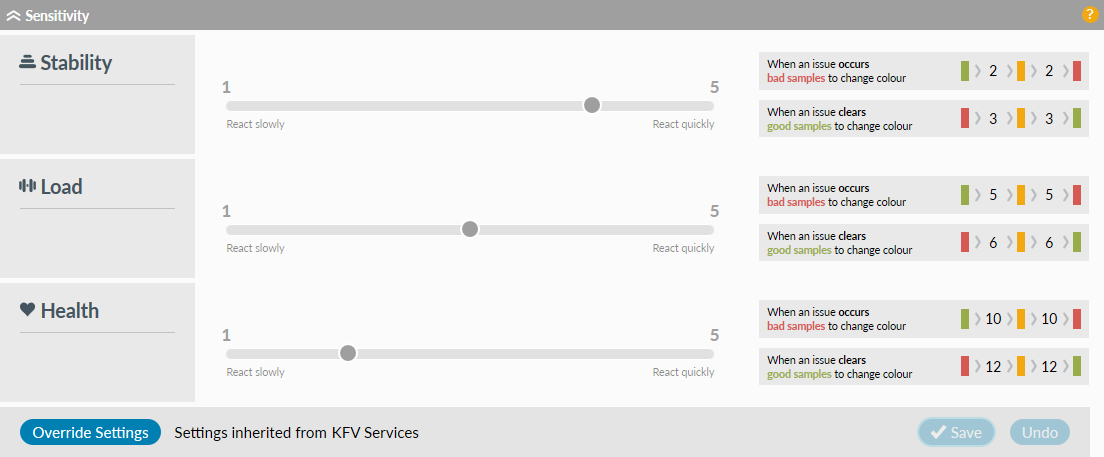
Thresholds
The tables below show how each metric changes a heat tile and generates an alert (if one has been set up) based on the sensitivity settings in the previous image.
| Turning from green to amber and eventually red | |||
|---|---|---|---|
| Metric | Example condition for bad sample | Samples to turn from green to amber | Samples to red |
| Stability | Port is down | 2 | 2 more; 4 in total |
| Load | >60% | 5 | 5 more; 10 in total |
| Health | Errors per 1000 frames rate >1; | 10 | 10 more; 20 in total |
| Returning back from red to amber and eventually green is a similar process | |||
|---|---|---|---|
| Metric | Example condition for good sample | Samples to turn from red to amber | Samples to green |
| Stability | Port is up | 3 | 3 more; 6 in total |
| Load | ≤60% | 6 | 6 more; 12 in total |
| Health | Errors per 1000 frames rate ≤1 | 12 | 12 more; 24 in total |
Supported Manufacturers
Refer to our Switch functionality page for details of manufacturers supported.